README .NET Apps @ ctrlX
![]()
Introduction
This document describes how to setup up your development environment for building self-contained ctrlX Apps based on Microsoft .NET runtime.
Self-contained means, your App contains an already matching and optimized .NET runtime for your target architecture, so there's no need to install any additional .NET runtime.
All samples generate Apps (snaps) for the targets
- ctrlX COREvirtual (amd64)
- ctrlX CORE (arm64)
Prerequisites
In this chapter we describe how to install the necessary components on a development environment based on a QEMU VM.
How you can create and run a QEMU VM is described here.
Installation of .NET SDK on the QEMU VM
Start a SSH session and login into the VM with boschrexroth/boschrexroth:
ssh -p 10022 boschrexroth@localhost
Start the script to install .NET as snap on your VM (~/ctrlx-automation-sdk/scripts):
./install-dotnet-sdk.sh
When installation is finished you can check your installed SDKs:
dotnet --list-sdks
The output should show the installed version and the path of ths dotnet-sdk.
Check your Runtime:
dotnet --list-runtimes
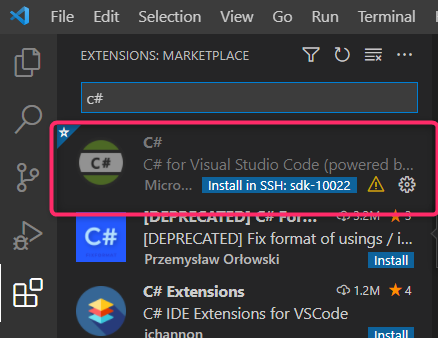
Install the Visual Studio Code C# extension from Marketplace
We recommend to use Microsoft Visual Studio Code on your host computer as IDE - see here.
To develop and test .NET application for the ctrlX we have to install the C# extension in the VM.
- Start Visual Studio Code and connect it with the QEMU VM.
- Select the extension icon in the left side bar and enter c#
- Select the C# extension and click 'Install in SSH'
Prepare NuGet on the QEMU VM
.NET projects can use NuGet packages. Therefor we have to provide some prerequisites on the VM.
If you're behing a corporate proxy, you have to configure the NuGet Proxy in configuration file:
/home/${USER}/.nuget/NuGet/NuGet.Config
Edit the NuGet configuration file with your preferred editor or with Visual Studio Code and add a config section containing the http_proxy and https_proxy inside the configuration section like shown below.
Example:
The following sample uses the Px Proxy running on the host computer. From the VM's point of view, this proxy can be reached with the URL http://10.0.2.2:3128.
  <configuration>
        <config>
              <add key="http_proxy" value="http://10.0.2.2:3128" />
              <add key="https_proxy" value="http://10.0.2.2:3128" />
        </config>
  ...
  </configuration>
Building a .NET Sample Project
Each .NET sample provides a rich set of tasks for your convenience.

- Click on Terminal -> Run Task.
- Choose your preferred task to run.
Build (compile) your code
- Click on Terminal -> Run Task.
- Choose Task build.
Clean your code
- Click on Terminal -> Run Task.
- Choose Task clean.
Publish your (self-contained) application
- Click on Terminal -> Run Task.
- Choose any Task publish * matching your architecture and mode.
make snap
- Click on Terminal -> Run Task.
- Choose any Task make snap * matching your architecture and mode.
Debugging
Debug on QEMU VM
Just press F5 or
- Click on the Run from the menu.
- Choose Run -> .NET Core Launch (console).
- Press the green Play button.
Debug snap on ctrlX COREvirtual
- Click on Terminal -> Run Task.
- Choose any Task make snap amd64.
- Install snap on ctrlX COREvirtual via ctrlX web interface
- For debugging snaps see here
Debug snap on ctrlX CORE
- Click on Terminal -> Run Task.
- Choose any Task make snap arm64.
- Install snap on ctrlX CORE via ctrlX web interface
- For debugging snaps see here
Now you're ready to code .NET on ctrlX!
Best Practise
Provider Concepts
There different concepts to write a ctrlX Data Layer provider:
Create and register nodes with individual node handlers
Create a provider, which creates and registers all nodes with an individual node handler
        n x CreateNode
        n x Register
        Node : Handler = 1:1
Recommendation:
- Use for a small/medium of nodes with individual node handling.
- Use for a logical grouping and managing of nodes.
Pros:
- The ctrlX Data Layer is managaging your node hierarchy: No implementation of OnBrowse() required (return DL_UNSUPPORTED or DL_OK with an empty list).
Contras:
- Not efficent for a large/very large set of nodes to handle.
Samples:
- datalayer.provider
Create and register nodes with same node handler
Create a provider, which creates individual nodes and registers all nodes individually with same node handler.
        n x CreateNode
        n x Register
        Node : Handler = n:1
Recommendation:
- Use for a small/medium of nodes with common node handling
- Use for a logical grouping and managing of nodes.
Pros:
- The ctrlX Data Layer is managaging your node hierarchy: No Implementation of OnBrowse() required (return DL_UNSUPPORTED or DL_OK with an empty list).
Contras:
- Not efficent for a large/very large set of nodes to handle.
Samples:
- datalayer.provider.alldata
Virtual provider (lightweight): Register on wildcard and manage virtual nodes
Create just one node with a single node handler, registered to a wildcard address (e.g. myroot/**) and managing the nodes for your own. This lightweight handler returns virtual nodes in OnBrowse() method. See ctrlX Data Layer documentation for details.
        1 x CreateNode
        1 x Register
        Node : Handler = n:1
Recommendation:
- Use for a large/very large or dynamic set of nodes (big data provider).
- Use if you want to manage the nodes in your application code.
Pros:
- Very efficient.
Contras:
- The ctrlX Data Layer is not managaging your node hierarchy: You have to return the valid data in OnBrowse().
Samples:
- datalayer.provider.virtual
Pitfalls
Arithmetic operators of different integral or foating point types
The following operators perform arithmetic operations with operands of numeric types:
- Unary: ++ (increment), -- (decrement), + (plus), and - (minus) operators
- Binary: * (multiplication), / (division), % (remainder), + (addition), and - (subtraction) operators
Those operators are supported by all integral and floating-point numeric types.
In the case of integral types, those operators (except the ++ and -- operators) are defined for the int, uint, long, and ulong types.
When operands are of other integral types (sbyte, byte, short, ushort, or char), their values are converted to the int type, which is also the result type of an operation.
When operands are of different integral or floating-point types, their values are converted to the closest containing type, if such a type exists. For more information, see the Numeric promotions section of the C# language specification.
The ++ and -- operators are defined for all integral and floating-point numeric types and the char type.
Example:
Let' say we just wan't to increment a sbyte Variant value by keeping the data type, we have cast the result after performing the arithmetic operation:
  sbyte value = 42;
  var oldVariant = new Variant(value)
  var newVariant = new Variant((sbyte)(oldVariant.ToSByte() + 1));
- Please see here for more informations.
Support
Developer Community
Please join the Developer Community
SDK Forum
Please visit the SDK Forum
Issues
If you've found an error in these sample, please file an issue
License
SPDX-FileCopyrightText: Bosch Rexroth AG SPDX-License-Identifier: MIT